Invoices / Bills
As explained in Accounting Overview and Transactions (Instructions), Invoices are used to record money coming in from customers, while Bills are used to record expenses owed to vendors.
An Invoice may represent product sales, service charges, salary income, or other receivables. A Bill works in the opposite direction: it is used for purchases, service costs, salaries, or other payables.
Because Invoices and Bills share the same layout and behavior, this page explains both together in three parts:
Use the same guidance on this page for both Invoices and Bills. In most places, the only difference is the business direction: customer income versus vendor expense.
You can access Invoices or Bills page from the dedicated Accounting top menu.
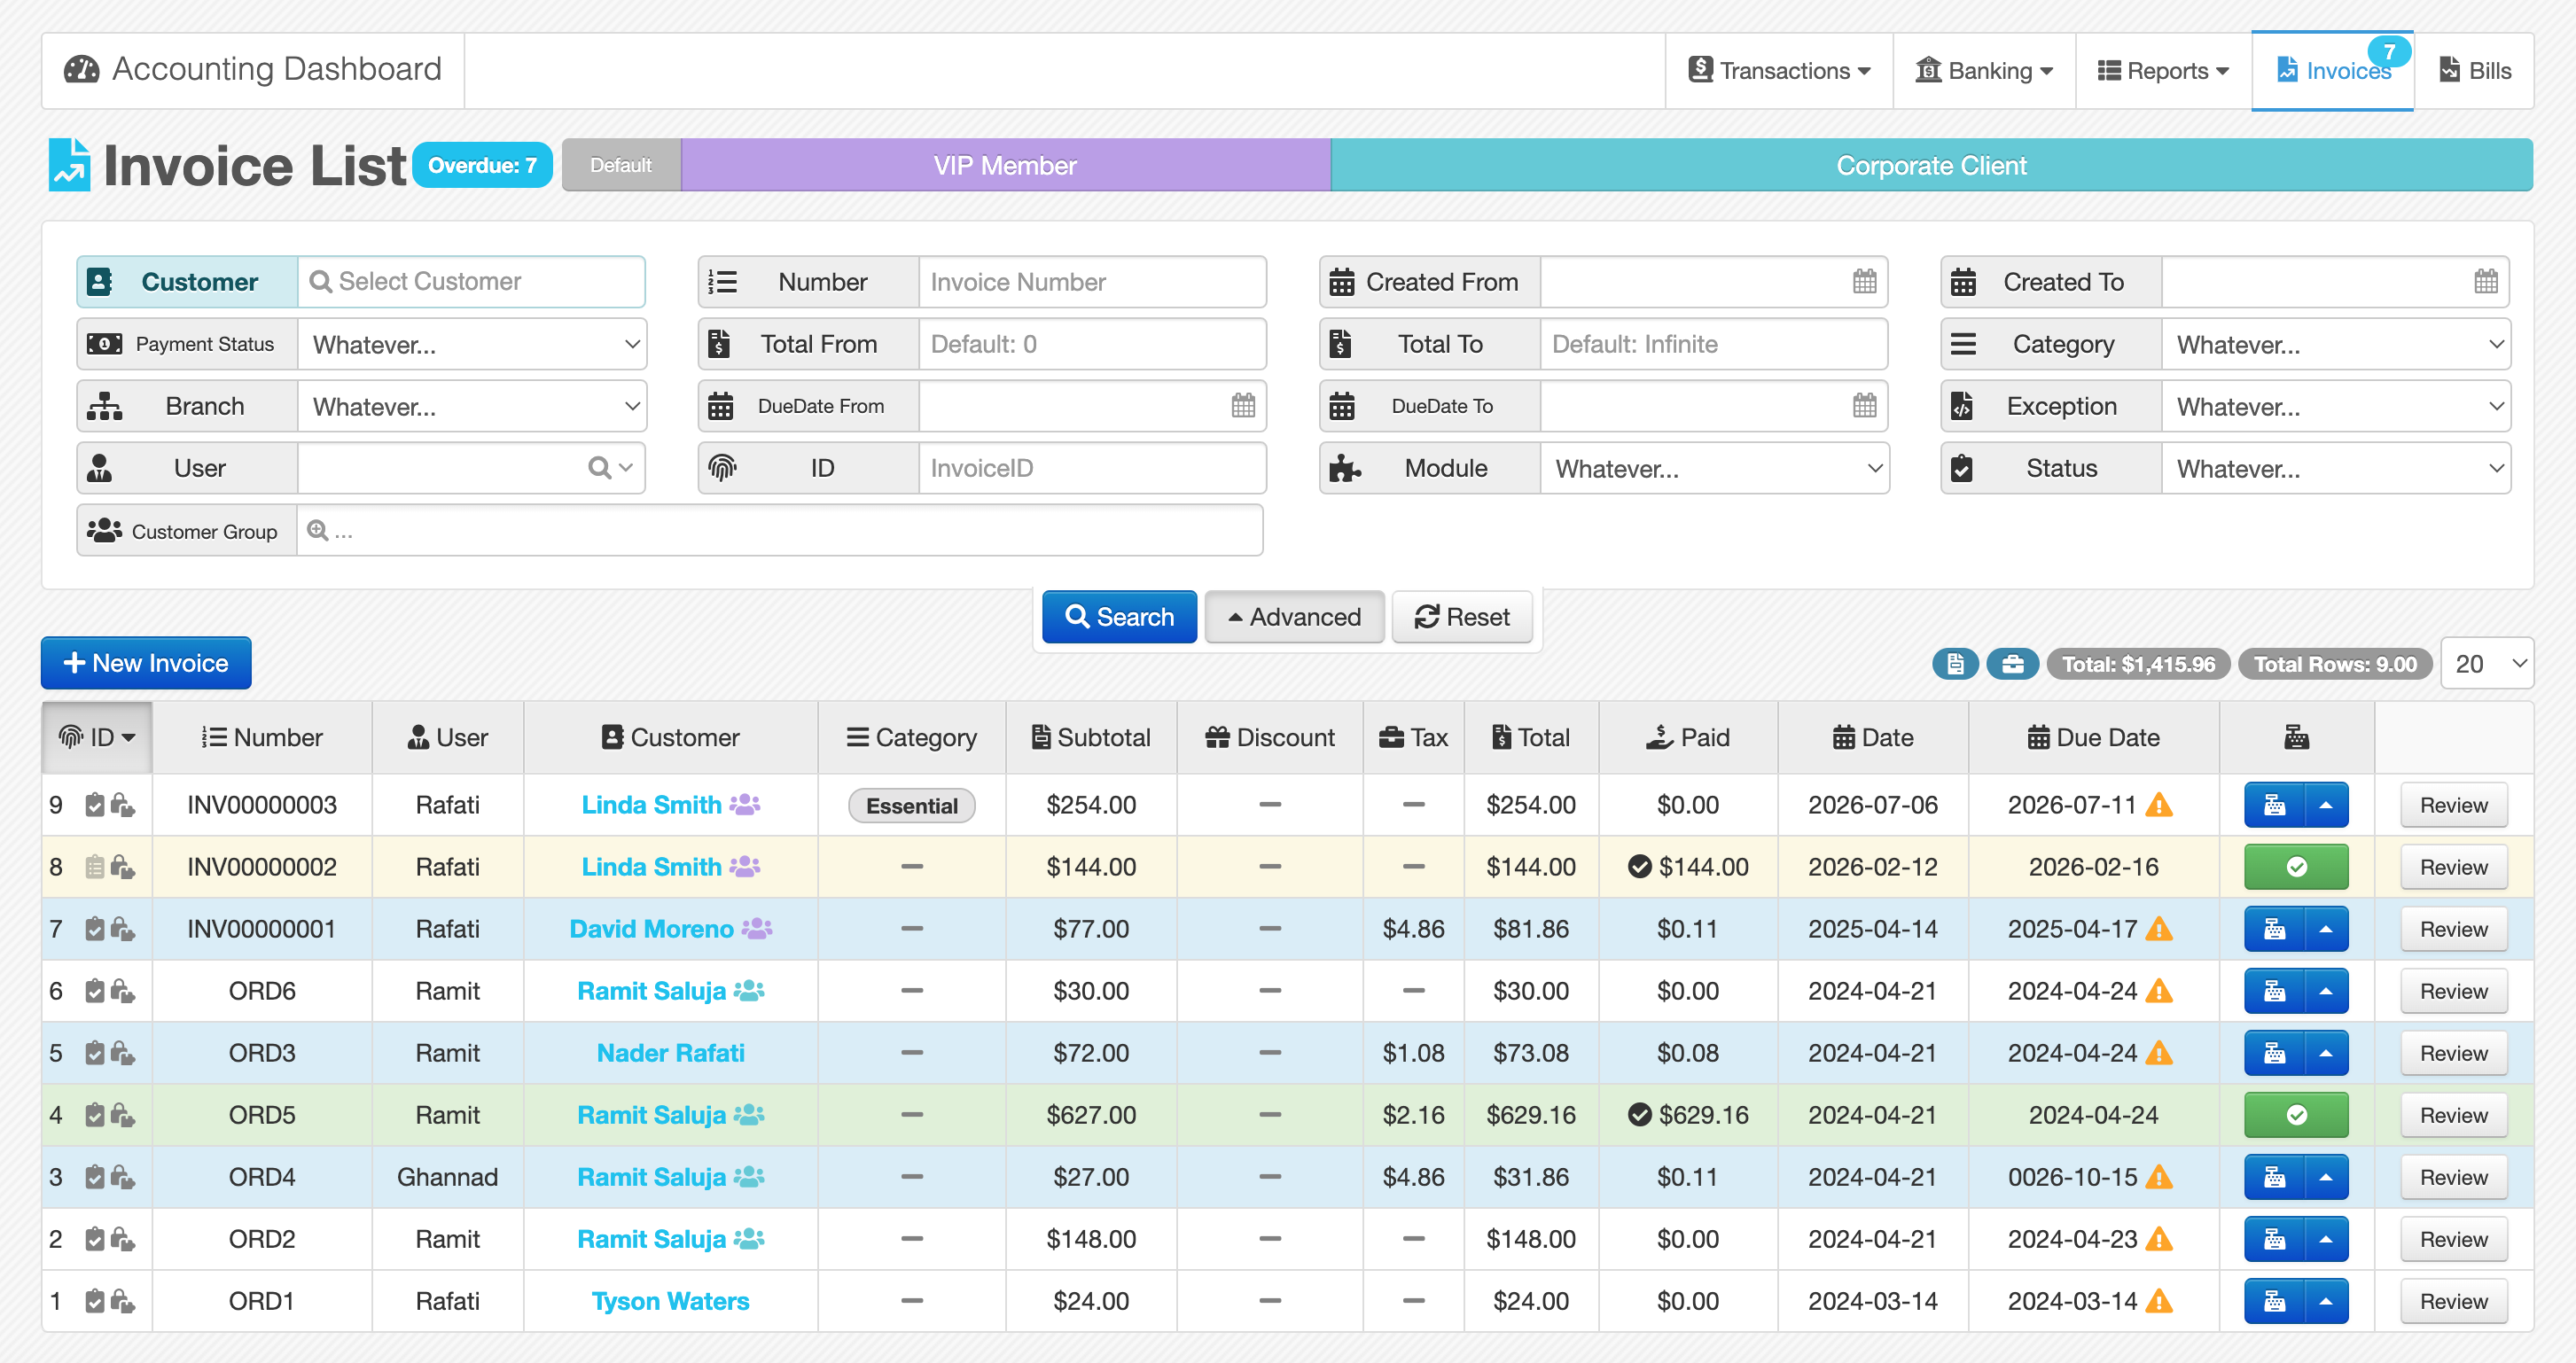
The first screen is the List & Search page, where you can filter records, review totals, open a document, or create a new one.
List & Search
Like other reporting pages in Caramel, this page is built around two main parts:
- a filter section for searching
- a results table for browsing matching records
However, Invoices / Bills also include an extra visual summary at the top of the page.
Group Progress Bar
Next to the page title, a colorful Progress Bar shows the distribution of the current Invoices / Bills by contact group.
Each colored segment represents a Customer Group or Vendor Group, and the width of each segment is based on that group’s share of the total amount. These groups come from the Contacts module, where each customer or vendor can be assigned to a group. Groups can also have their own colors, and the same colors are used here.
When you hover over a segment, more details are shown, including:
- count (Invoices / Bills)
- total discount
- total tax
- total amount
This makes it easier to understand how the filtered results are distributed across your customer or vendor groups.
Filters
The filter area works the same way as other report pages.
Each filter has its own label, and you can combine filters to narrow the results. The first three rows contain the most commonly used filters and stay visible by default. To see more options, click Advanced.
Use Reset to clear all active filters.
Result Summary Badges
Above the table, on the right side, several summary badges are shown for the current filtered result set.
These badges include:
- SubTotal
- Items Discount
- Total Tax
- a Total badge
- Total Rows
Hover over the badges to see their amounts.
The Total badge behaves a little differently. To reduce calculation load, its hover details do not include payment-related totals by default. If you select a value in the Payment Status filter, payment totals are calculated and added to the hover details for Total.
Results Table
The table works like other tables in Caramel.
Each column has a header, and clicking a column header sorts the table by that column. Clicking again switches between ascending and descending order.
Common actions are available directly from the table:
- Quick Payment at the far right of each row lets you register a payment without opening the Review page
- after full payment, that action changes to a green status button: Paid
- clicking the green paid icon opens the payment history
- Review opens the full Review page for that Invoice / Bill
- clicking the ID column opens a quick preview in a modal
Use the ID column for a fast read-only preview, and use Review when you need full details and follow-up actions.
Add / Edit
You can create a new Invoice or Bill in two ways:
- from Transactions (Instructions)
- directly from the Invoices / Bills List & Search page using the Add button above the results table
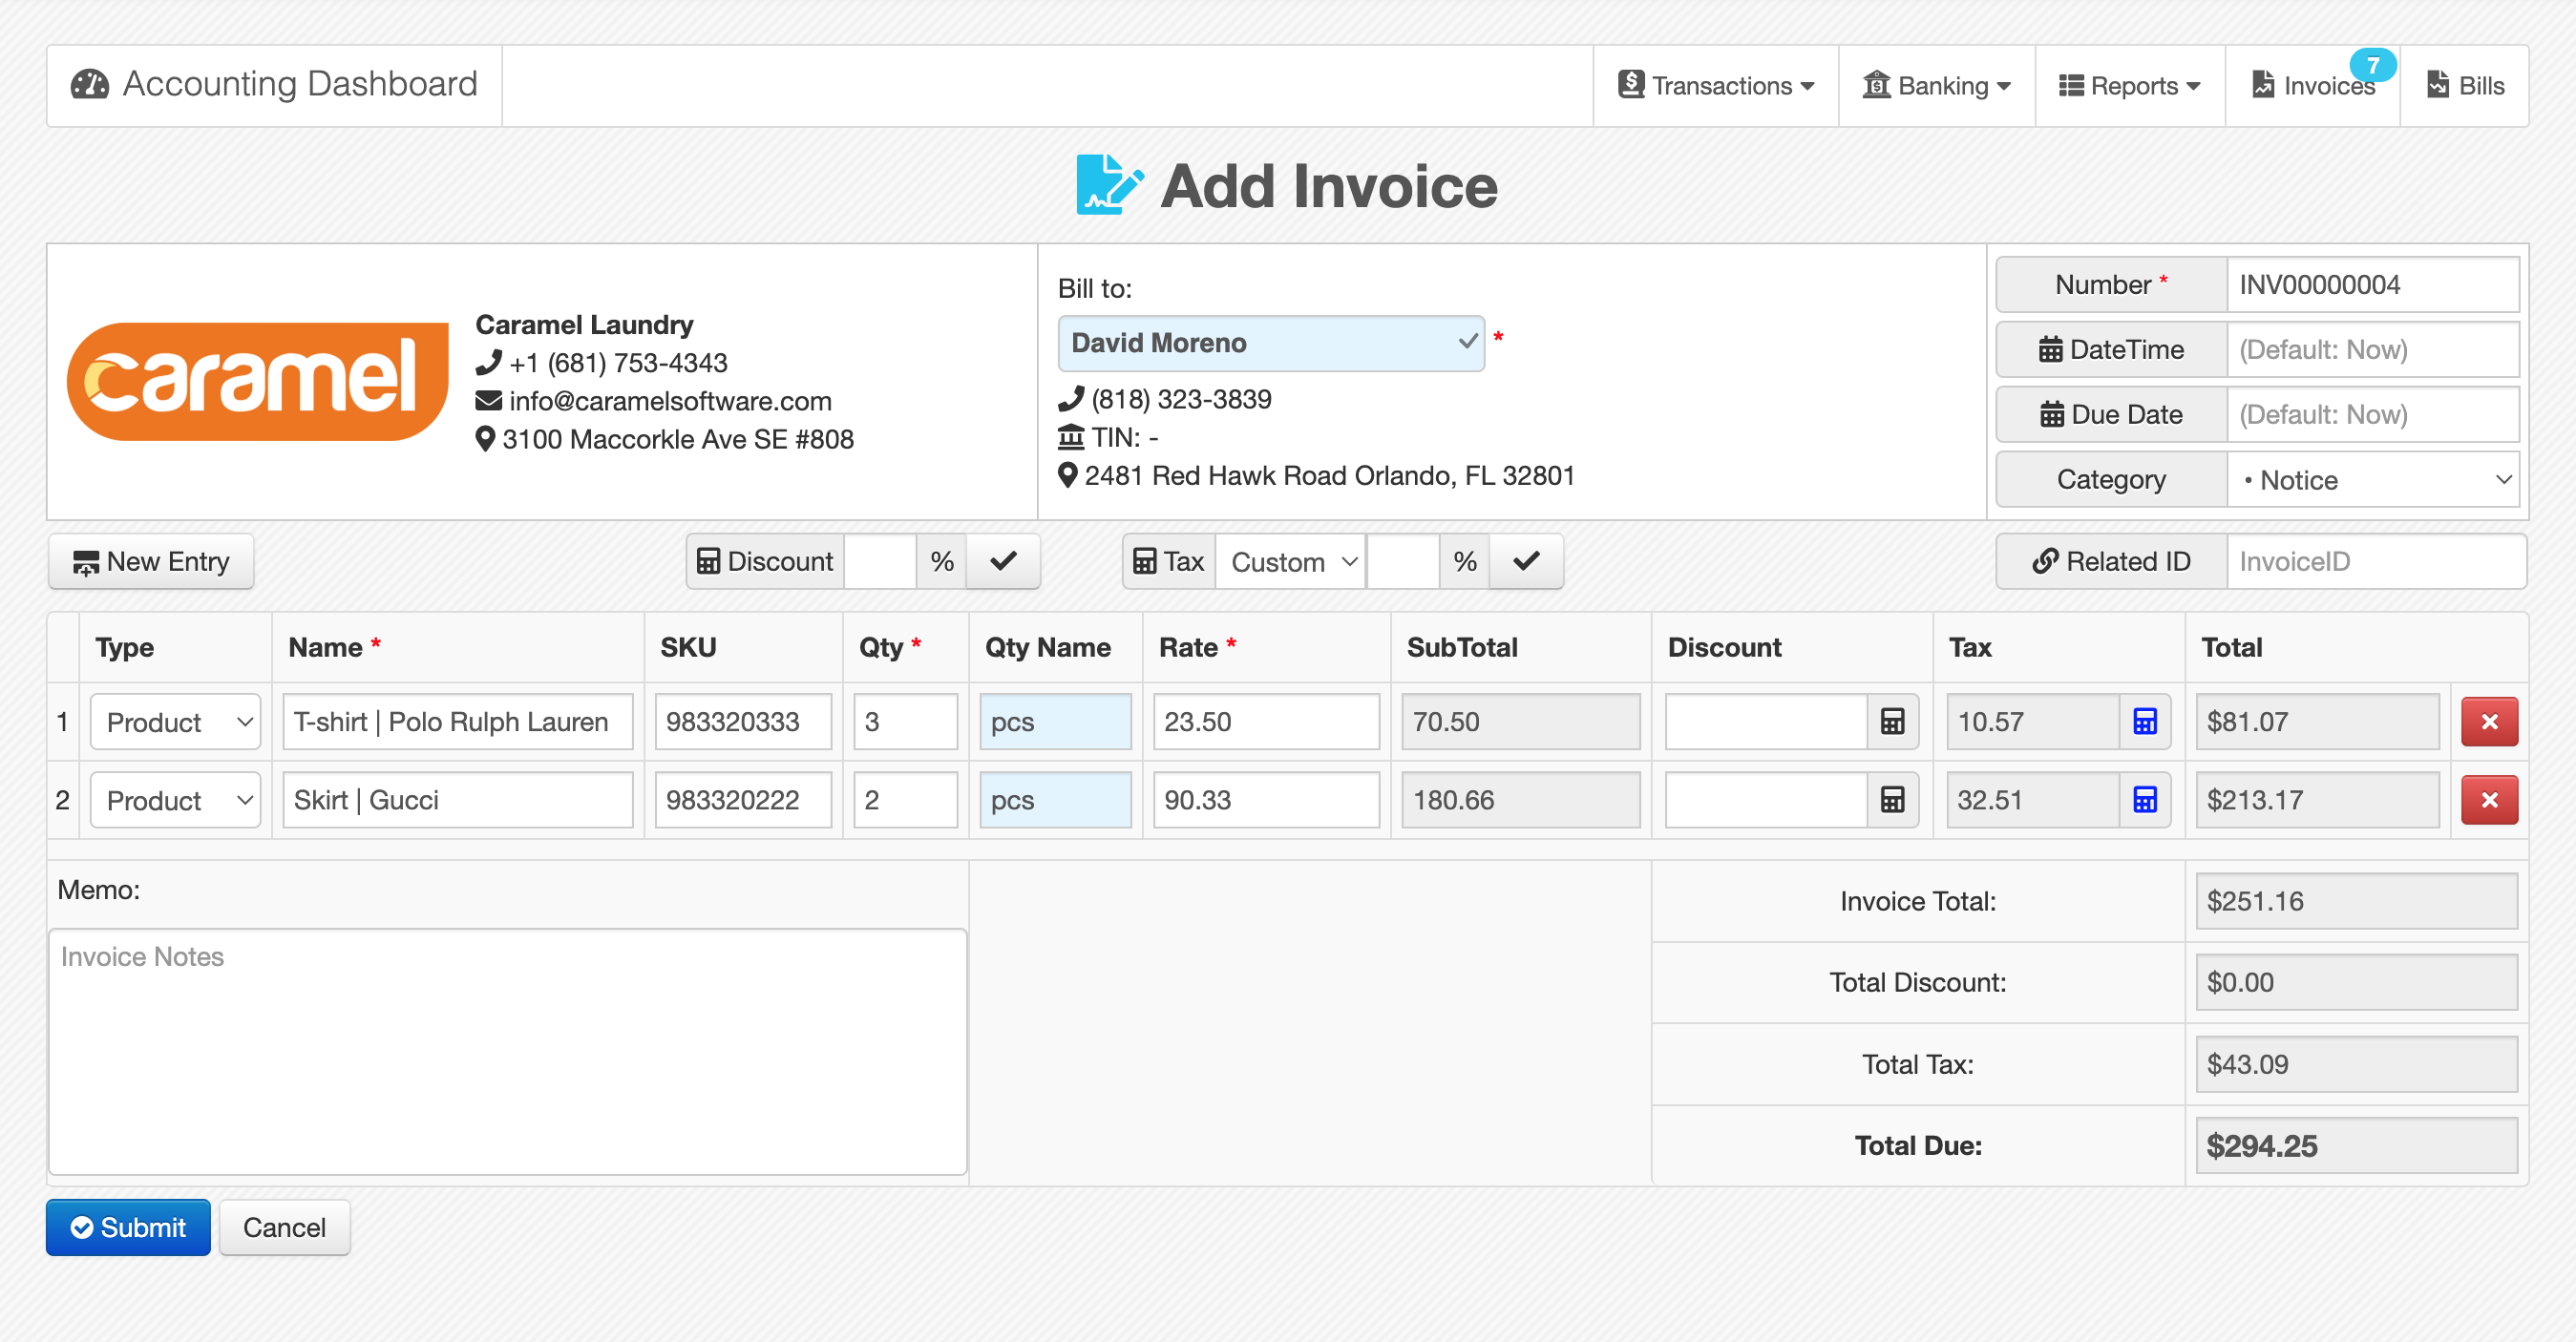
After clicking Add and selecting the customer or vendor, the entry form opens.
Fields marked with * are required.
Document Header Fields
The form includes general document information such as:
- Number *
A unique document number suggested automatically by the system, usually in an incremental format such asINV00000018. You can change it manually, but it must remain unique. - DateTime
The document date. By default, it uses the current date and time, but it can also be set to a past or future value. - Due Date
The expected settlement date. It also defaults to the current date and time, but you can change it as needed. Documents that pass their due date appear in overdue counters in the Invoices / Bills page and in the Accounting top menu. - Category
Optional, but recommended. Using categories helps keep records organized and improves future reporting. - Branch *
Used when the document should be assigned to a specific branch. - Related ID
Used to connect one document to another. This field uses the internal ID, not the document Number. You can find the ID in the List & Search table.
Entries Table
Each row in the Entries table represents one item or service line.
An entry includes:
- Type
The entry type, such as Product, Service, or similar item categories. - Name *
Required. As you type, Caramel suggests previously used entries. - SKU
The product or item identifier. This field can be left empty. - Qty *
The quantity for that row. - Qty Name
The unit of measure. You can type it manually, but using consistent units is better for reporting. Suggestions may be provided from the Units module. - Rate *
The amount for one unit of that entry. - SubTotal
Read-only. Calculated automatically asQty × Rate. - Discount
The discount amount for that row. Use the small icon to calculate it as a percentage of the row subtotal. - Tax
The tax amount for that row. Use the small icon to calculate it as a percentage of the row subtotal. - Total
Read-only. Calculated automatically asSubTotal - Discount + Tax.
Managing Entry Rows
To add a row, click New Entry in the left side of the Entries table header.
You can click it multiple times to add as many rows as needed.
To remove a row, click at the end of that row.
Header-Level Discount and Tax
In the Entries table header, Discount and Tax are also available as percentage-based controls for applying the same logic across all entries.
This is useful when the same discount or tax rule should be applied to every row, instead of entering values one by one.
Submitting the Document
To save the document, click Submit at the bottom of the page.
By default, submitting saves the document with Verification Status = Confirmed.
This default can be changed in module settings so that new Invoices / Bills are first created as Draft. That is useful in workflows where an accountant or manager must review the document before final confirmation.
Review Page
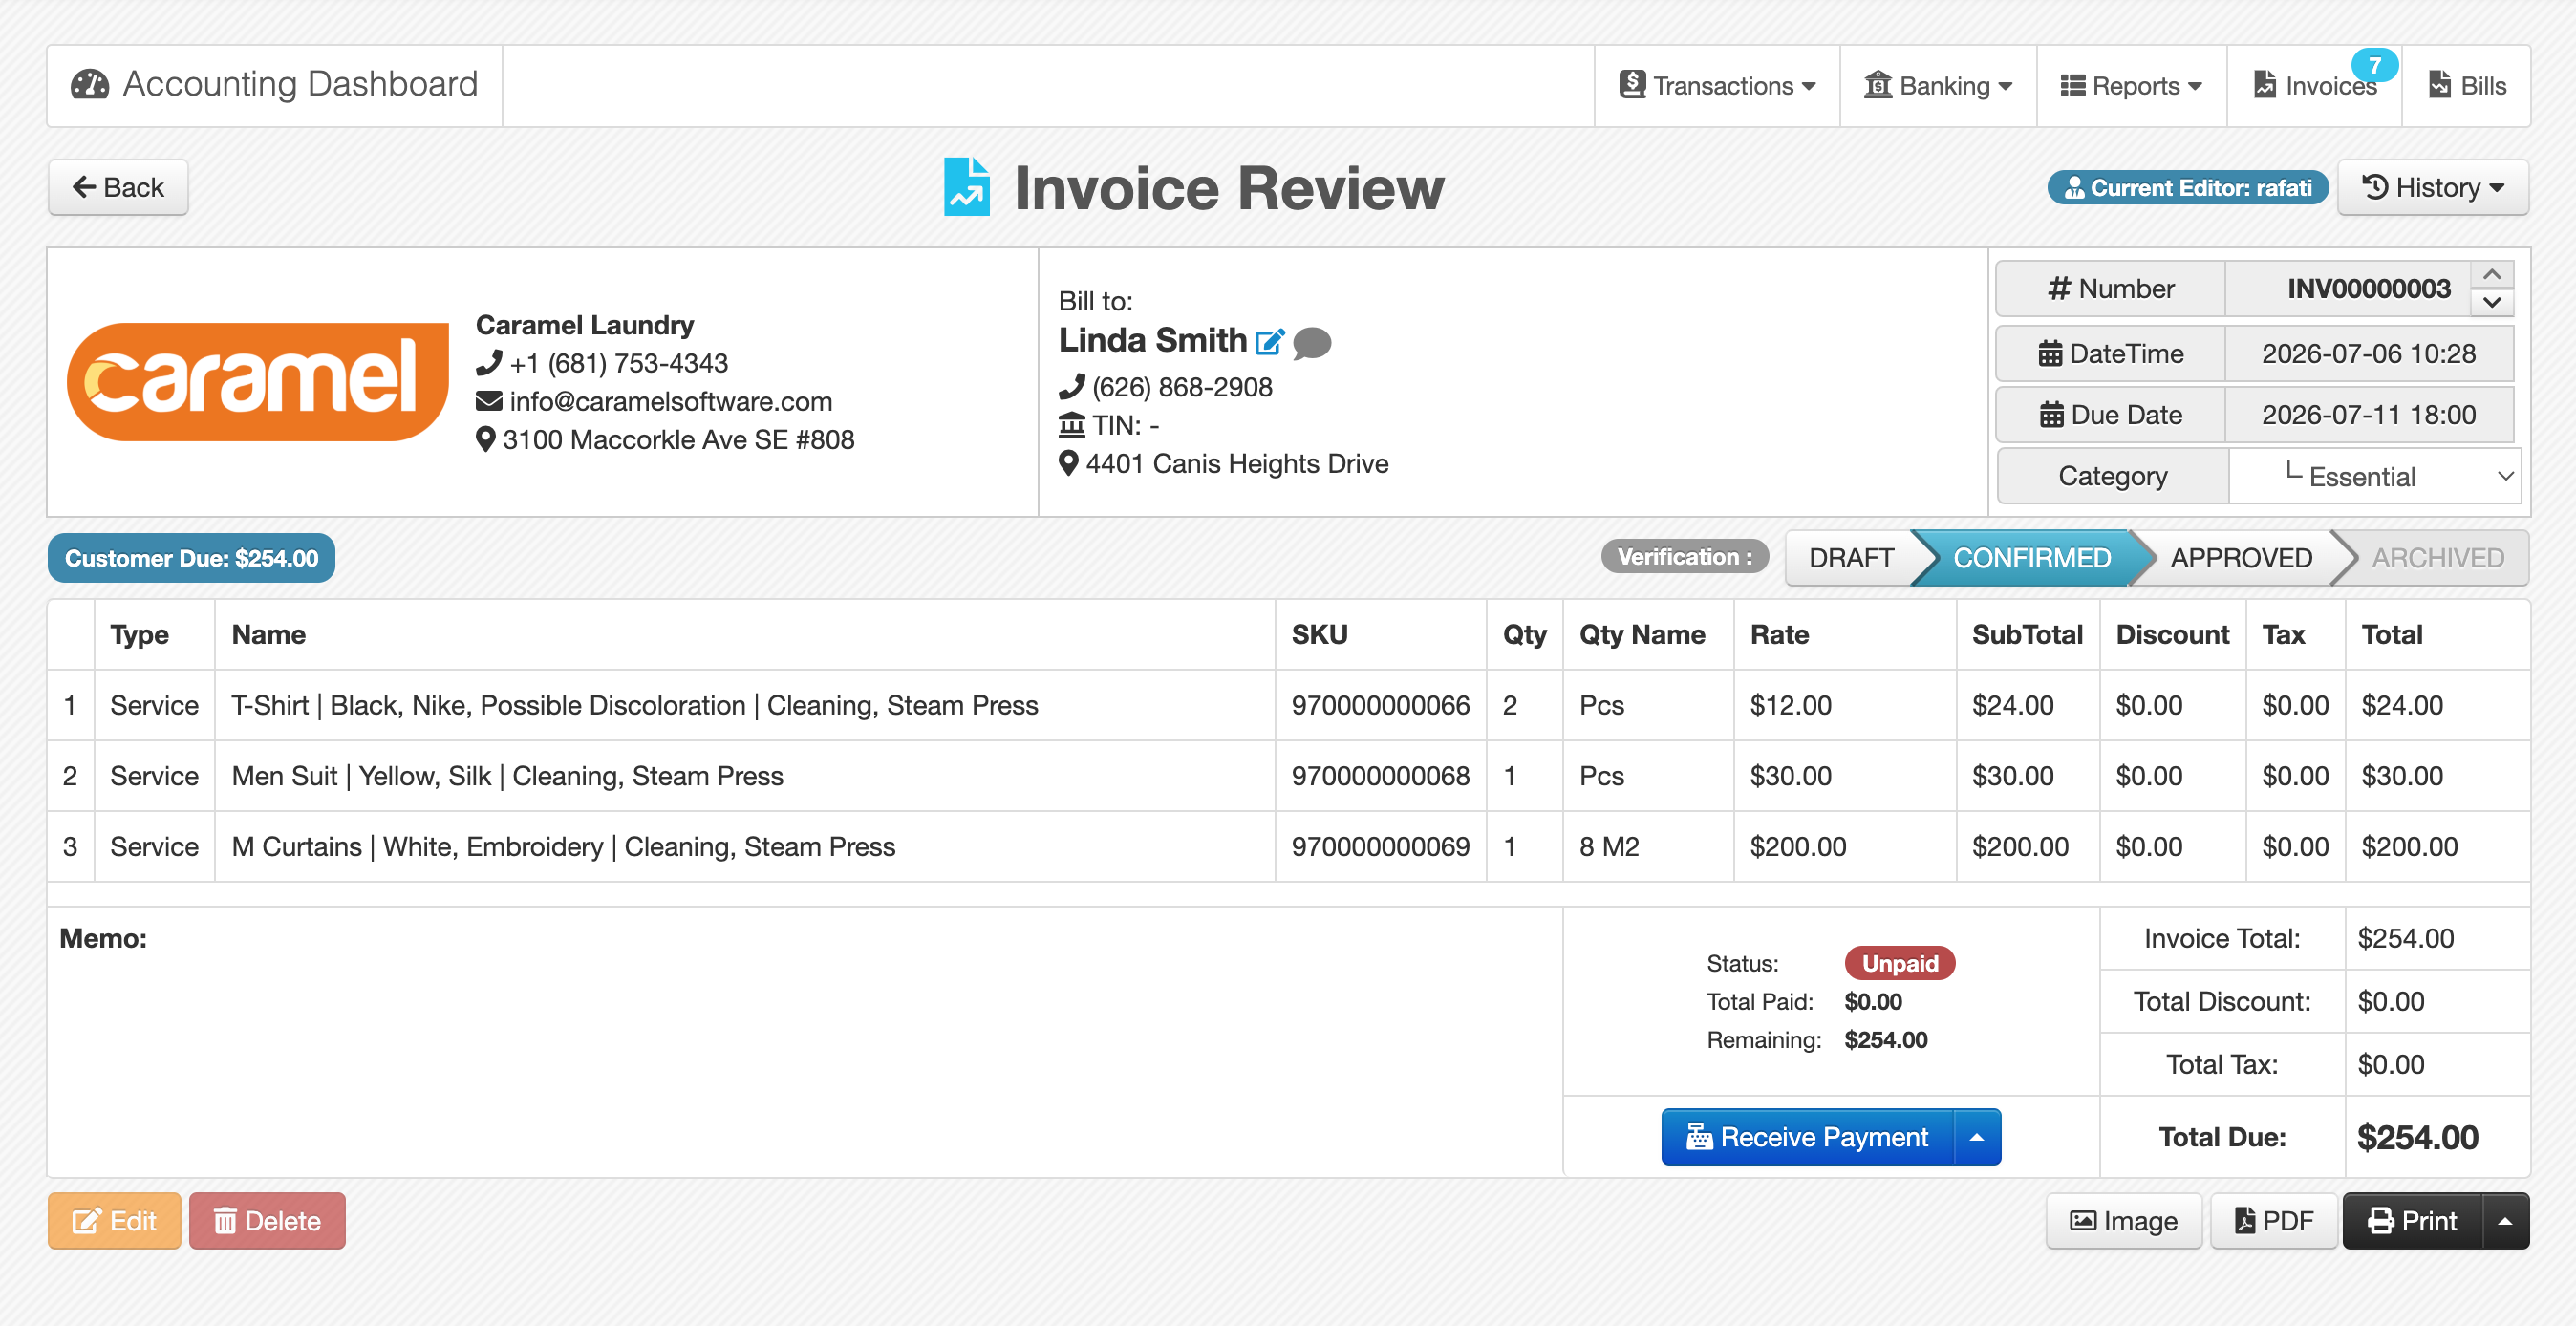
The Review page looks similar to the Add / Edit form, but it is read-only and is designed for actions that happen after the document has been created.
History
If the document has been edited more than once, a History button appears at the top of the page.
This lets you review change history and see which user made each edit.
Verification Status
Above the Entries table, on the right side, there is a breadcrumb-style status path:
DRAFT > CONFIRMED > APPROVED > ARCHIVED
These buttons control Verification Status.
Changing status depends on the user’s role and permissions.
Customer Due / Vendor Payable
On the left side above the Entries table, there is an informational badge for the related contact:
- Customer Due for Invoices
- Vendor Payable for Bills
This badge shows the current outstanding amount. Hovering over it reveals more contact-level details such as: Credit, Debit, Balance
Payment Box
Below the Entries table, the Payment box shows payment-related information and actions.
This area includes:
- Total Paid
- Remaining
- Payment + a small caret button
The main Payment button registers a new payment for the document. Once the document is fully paid, this button becomes disabled.
The caret button remains active and opens more options.
Payment Menu Options
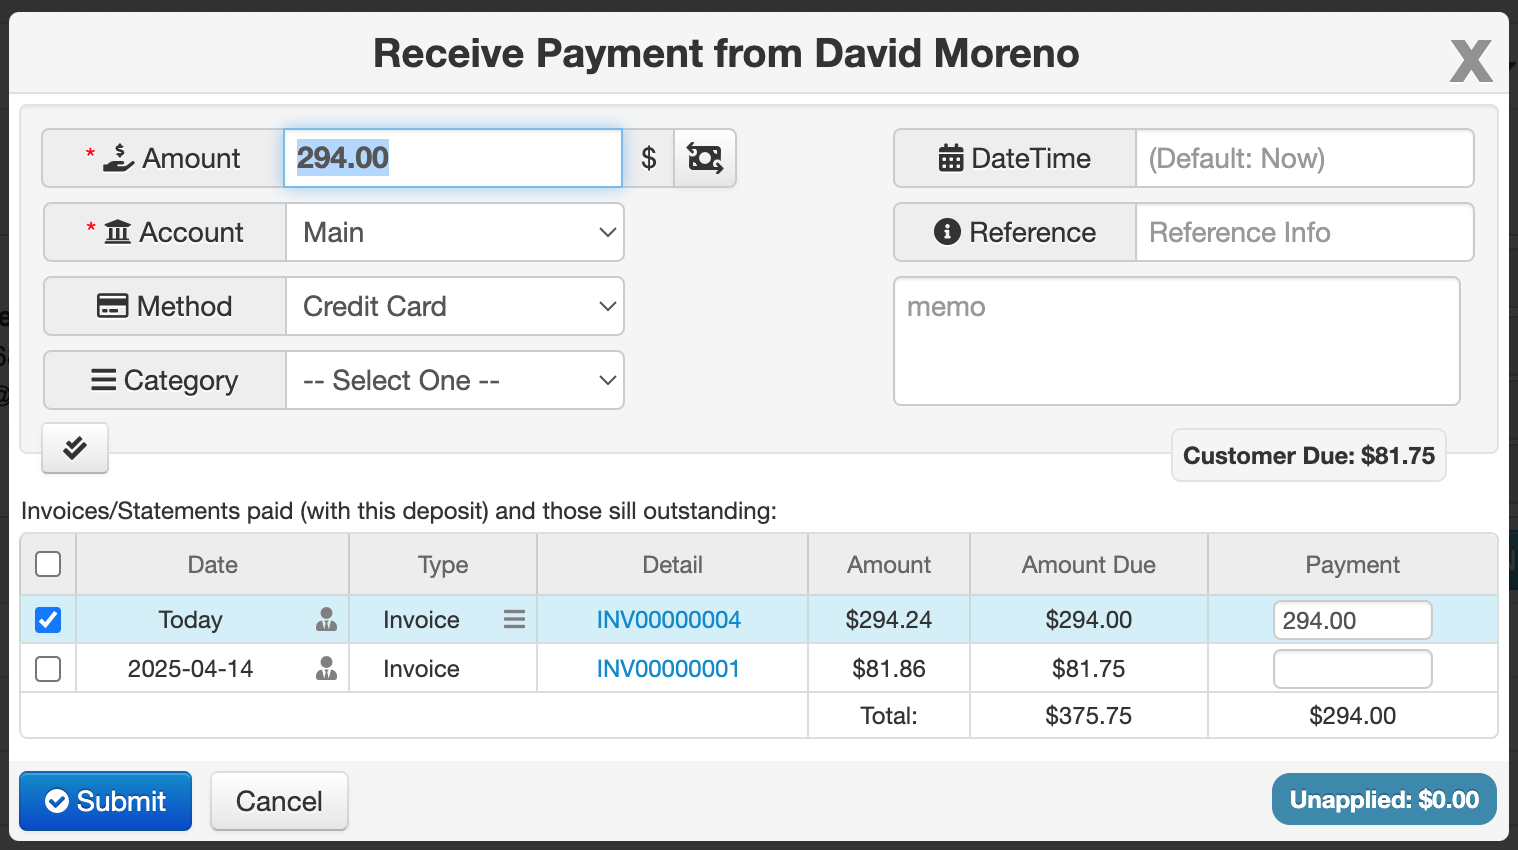
The caret menu includes:
- Add More Payment
- Add Discount
- Add Credit
- Statement / Check
- Use Credits / Payment History
Detailed explanations of payment transaction types are available in Transactions (Instructions).
Notes About Discount Transactions
A few points are important when using Discount from the payment area:
- A discount transaction is treated as a type of Credit tied to a single document (Invoice, Bill)
- It is not meant to be reused across multiple Invoices / Bills
- If module settings allow rounding small balances, Caramel can automatically create a Credit (Discount) transaction after confirmation to clear tiny remaining amounts within the configured range
- If the document returns to edit mode and the total changes, that automatic rounding transaction and discounts are removed and recalculated if needed after confirmation
- The Discount option is disabled in the Payment Menu while the document is still in Draft
- The document must be at least Confirmed before discount transactions can be used
The preferred and cleaner way to apply discounts is during document entry, using the Discount column in the Entries table. Payment-level discount and credit actions are mainly for special cases and are usually not recommended for standard accounting and reporting workflows.
Bottom Action Bar
At the bottom of the Review page, additional action buttons are shown.
These buttons are used for output and attachment-related actions:
- Print prints the document
- PDF saves the current invoice view as a PDF
- Image is used for uploading a related image when needed
For better PDF quality, especially when you want cleaner vector-like output, it is better to use Print and choose a PDF printer from the browser instead of using the built-in PDF button.
At the moment, the PDF button saves the document as an image-based PDF rather than a vector-based one. This may improve in future updates.
On the left side:
- Delete
- Edit
Edit and Delete Rules
Edit and Delete are only available when the document status is Draft.
If the document is in any later status, these buttons are disabled. To edit or delete such a document, it must first be returned to Draft.
If an Invoice or Bill was created by another module outside Accounting, such as Orders, its content cannot be edited or deleted from Accounting. This prevents inconsistencies between modules. In these cases, Accounting only displays the document and includes it in financial calculations. Any content changes must be made from the source module.